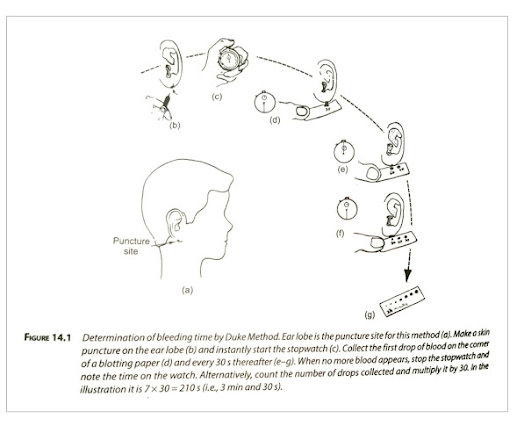
Determination of Bleeding Time by DUKE method
PRACTICAL
Determination of Bleeding Time by DUKE method.
Duke method is easy to perform and requires minimal equipment or laboratory skill.
INTRODUCTION
A bleeding time test determines how quickly your blood clots to stop bleeding. The test is a basic assessment of how well your blood platelets work to form clots. Platelets are tiny cell fragments that circulate in your blood. They’re the first cells to react to a blood vessel injury. They seal off the wound to prevent more blood from escaping. Determination of bleeding time recognizes vascular defect and platelet disorder.
REQUIREMENT
- Alcohol sponge
-Sterile lancet
- Filter paper (circular) or blotting paper
- Stopwatch or a watch with seconds hand.
Note: Arrange all the necessary materials before starting the test. As the test is performed on the patient, you must approach the patient with proper bedside manner and must be well organized while performing the test. This improves public relations and builds confidence in the patient.
SPECIMEN
- Performed on patient; no specimen necessary.
NORMAL RANGE
- Duke Method : 1 to 5 minutes.
PRINCIPLE
A Standard incision is made in the skin of the patient and the length of time requited for bleeding to cease is recorded. There are two methods applied in the determination of bleeding time -the Duke method and the Ivy method. The Duke method is now considered to be obsolete because the results very widely. Both the Duke method and Ivy method are described here as many laboratories still follow the old Duke method. With Duke method, the incision is made on the ear lobe while in case of Ivy method, the incision is made on the forearm under standardized conditions. The Ivy method is more reliable and should be the method of choice.
PROCEDURE
1. Gently clean the earlobe with an alcohol sponge. Do not rub. Allow it to dry completely.
2. Hold a glass slide behind the earlobe for support. Make a deep puncture with a sterile lancet. Start the stopwatch and discard the glass slide. The blood should flow freely, without squeezing the earlobe.
3. Using a circular filter paper, blot the drop of blood coming out of the incision every 30 s. Do not allow the filter paper to touch the bleeding spot. Keep each subsequent drop a little further along the side of the filter paper; the drops become progressively smaller.
4. When bleeding ceases, stop the stopwatch.
5. Count the number of drops on the filter paper and multiply by 30 s.
6. Report to the closest minute.
Note: If the bleeding continues for more than 10 min, discontinue the test and apply pressure to the bleeding spot.
PRECAUTIONS
1. This test should be avoided in a patient with a low platelet count.
2. A patient with aspirin may have a false positive (raised value).
3. Avoid in patients with Keloid formation or senile skin changes.
4. Avoid in patients who have undergone mastectomy or axillary lymph node dissection .
5. Avoid uncooperative patients.
Content from:
https://labpedia.net/bleeding-time-bt/
.
Comments
Post a Comment